
React is a really popular library for creating amazing and interactive frontend apps. If you are even loosely familiar with JavaScript and React, you know that React is intended for Client-Side Rendered apps by default, and SEO, i.e: something that depends on sending page data on the server-side to Search Engine crawlers has not always been its forte.
To bridge this gap, a new pattern that's gained steam recently is creating Isomorphic React apps. I.E: React apps that can work on both the server and client-side, in this post, we'll look at how to create one from scratch. Although React does have support for server-side rendering built-in, it often takes some work to set it up. A great framework that pioneered this approach was Next.js, if you're new to this blog, you know that I'm a fan of Next.js with the plethora of features it provides.
By "can work on the server", I do not mean that it will handle server interactions, but rather that it can render a screen on the server-side instead of just sending a blank HTML page that is populated on the client-side by JavaScript. Check my post on How Server-Side Rendering With React works.
Software Engineering to me is all about a never-ending drive that keeps asking you "Can you build this?"
Hence in this post, inspired by "What I cannot build, I do not understand", we'll be creating a framework inspired by Next.js to build our own react apps with routing, that can provide a rendered version on the server as well as be completely interactive for the user on their devices. Best of both worlds.
As above, this post will build heavily on this post for concepts and patterns of Server-rendered React apps: How Server-Side Rendering With React works.
Features We'll be building
- Full support for Server-Side Rendering of our App's pages.
- Full interactivity for Client-Side Rendering and interactivity of the App's pages for end-users.
- Support for Static pages (I.E: Render on the server once and cache for all later requests)
- Data fetching for populating page's content on the server-side, i.e: Functionality like
getServerSidePropsandgetStaticPropsalong with a hook to get that data across the entire app at any component. - Custom Error pages to handle
404and500errors. - Caching of Page JavaScript bundles in production
- Tree-shaking (Dead-code elimination) for the bundle code
- Support for environment variables, both on client and server-side. All environment variables starting with
ISOMORPH_PUBLIC_will be exposed to the client-side as well.
What We'll be using
- Node.js
- Express for setting up our server
- React and ReactDOM for rendering our React Apps
- Babel for compiling our JSX and ES6+ code to regular JavaScript.
- Browserify for bundling our React apps and their dependencies into JavaScript that can run on the browser, along with other libraries that act as Browserify plugins.
To follow this post, and to also see a fully functional installable package, you can check out the corresponding Repository for Isomorph on GitHub.
Index
Given this is a long post, here's a link to the sections we're convering in this post:
- Setting Up Our App
- Handling Page Requests
- Setting Up Data Fetching
- Re-Rendering pages on the Client-Side
- Tree Shaking and Environment Variables support
- Handling Page SEO, Link Tags and Scripts
- Handling Static Pages
- Bundle Caching
- Cookie Parsing
- Custom Error Pages
- TypeScript Support
- Putting it all together
Setting Up Our App
Let's set up our app, plainly and simply. Create a directory like my-isomorphic-react-app. Then inside the directory, run the following:
npm init -y # Creates a package.json file for us and initializes the directory as a Node.js workspace
npm i --save express nodemon react react-dom
For compiling our code from ES6+ to ES5, we'll need Babel.
npm i --save @babel/cli @babel/core @babel/node @babel/preset-env @babel/preset-reactThen create a server.js file and add the following content to it:
import express from "express";

const app = express();

app.get("*", async (req, res) => {
	// For handling all requests at our server.
	return res.sendStatus(200);
});
const PORT = process.env.PORT || 5432;
app.listen(PORT, () => {
	console.log(`Listening at port: ${PORT}`);
});
Now we have set up our express app server file. We need to set up Babel to tell it how to compile our app down to ES5, given Node by default doesn't yet support the import syntax and the JSX syntax we'll be using for our React components soon. For doing so, we'll define a babel.config.json at our root with the following content:
{
	"presets": ["@babel/preset-env", "@babel/preset-react"],
	"comments": false
}
To set up compilation for our code, we'll add scripts to our npm file.
"scripts": {
+	"build": "babel ./src --out-dir ./.isomorph",
+	"build:watch": "babel --watch ./src --out-dir ./.isomorph",
+	"dev": "concurrently \"npm run build:watch\" \"nodemon ./.isomorph/server.js\"",
+	"start": "node ./isomorph/server.js"
},
With the above, we'll compile our code to the dist folder.
You might have noticed the dev command, for the active development of our project, in that case, we'll have to compile our code with all changes and listen to changes for restarting our server automatically using nodemon. To do so, we'll use concurrently to run both our build:watch command and nodemon ./.isomorph/server.js command concurrently.
npm i --save concurrently
npm run dev
Handling Page Requests
Let's assume our pages are going to be structured similarly to Next.js, in an src/pages folder.
We can now handle requests to page endpoints in two ways:
- Have a wildcard route request listener that listens to all requests using
*, and then sends back the appropriate page and its bundle. This is the approach we'll use since it makes handling404and500errors simpler in a central controller. - On startup of the server, generate route listeners for all the pages dynamically, this is simpler in case you want to handle routes with dynamic patterns, it can be done with the first approach as well, however, and this approach is more cumbersome.
app.get("*", async (req, res) => {
	const pageRoute = req.url;
	const pageImportPath = `pages${
		pageRoute.endsWith("/") ? pageRoute + "index" : pageRoute
	}`;
	const ComponentExports = await import(pageImportPath);
});
Here ComponentExports will be an object with the following structure (We'll handle checking for the existence of files and import errors in further sections of this post):
{
    "default": "<PageComponent",
    ... Other exports from the page file.
}
Hence we'll get Page's default export (The Page Component) in a variable:
const { default: ComponentDefault } = ComponentExports;We'll also create our central WrapperComponent that takes care of things like data passing to our page component, common config and common code in further sections.
import InitialDataContextProvider from "./InitialDataContextProvider";
const WrapperComponent = ({ Component }) => {
	return <Component />;
};
export default WrapperComponent;
Sending Back server-rendered React Component
Sending back our page's React component is pretty simple. We simply use ReactDOM/server's renderToString function to compile our React component with a WrapperComponent to a string, inject it into an HTML template and send it back.
import WrapperComponent from './WrapperComponent';
import { renderToString } from "react-dom/server";

app.use('*', async (req, res) => {
    ...

    const componentOutput = renderToString(
       // We'll look at initial data processing in the next section
        <WrapperComponent Component={ComponentDefault} />
    );

    const pageHTMLGenerated = `
        <html>
            <body>
                <div id="isomorph_root">
                    ${componentOutput}
                </div>
            </body>
        </html>
    `;

    if (!res.headersSent) return res.send(pageHTMLGenerated);
});
Setting Up Data Fetching
To pre-render our pages on the server, there is inevitably going to be some data we would want to fetch. For example, a blog post page might be using an independent Content Management System like Strapi from which the data has to be fetched. In such cases, Next.js provides two distinct data fetching methods (Three if you count getInitialProps).
Namely, getStaticProps for static pages that require some data fetching (Blog post pages, Terms and conditions pages etc) and getServerSideProps for server-rendered pages (Data that is dynamic based on the user visiting the page, often identified by a cookie in the request, or fast-changing E-Commerce product pages).
Refer to this post to know how data fetching and prefetching based on it works.
We'll allow our pages to follow the same pattern of fetching the data on the server and receiving it as props/data accessible throughout the page via a hook named useInitialData.
const {
	default: ComponentDefault, // The React component for the page
	getPropsOnServer = nullFunction,
	getStaticProps = nullFunction,
} = ComponentExports;
const context = generateServerSideContext(req, res, isStaticPage);
let [initialProps, staticProps] = await Promise.all([
	getPropsOnServer(context),
	getStaticProps(context),
]);
Here generateServerSideContext is a helper function that generates a standard object for server-rendered or static pages.
const generateServerSideContext = (req, res, isStaticPage = false) => {
	if (isStaticPage) return { env: process.env, url: req.url };
	return {
		req,
		res,
		cookies: req.cookies,
		url: req.url,
		query: req.query,
		params: req.params,
		env: process.env,
	};
};

export default generateServerSideContext;
Now using the initialProps or staticProps depending on the choice of the page, we'll pass this data on the server to our WrapperComponent.
const initialData = isStaticPage ? staticProps : initialProps;
const componentOutput = renderToString(
<WrapperComponent Component={ComponentDefault} pageProps={initialData} />
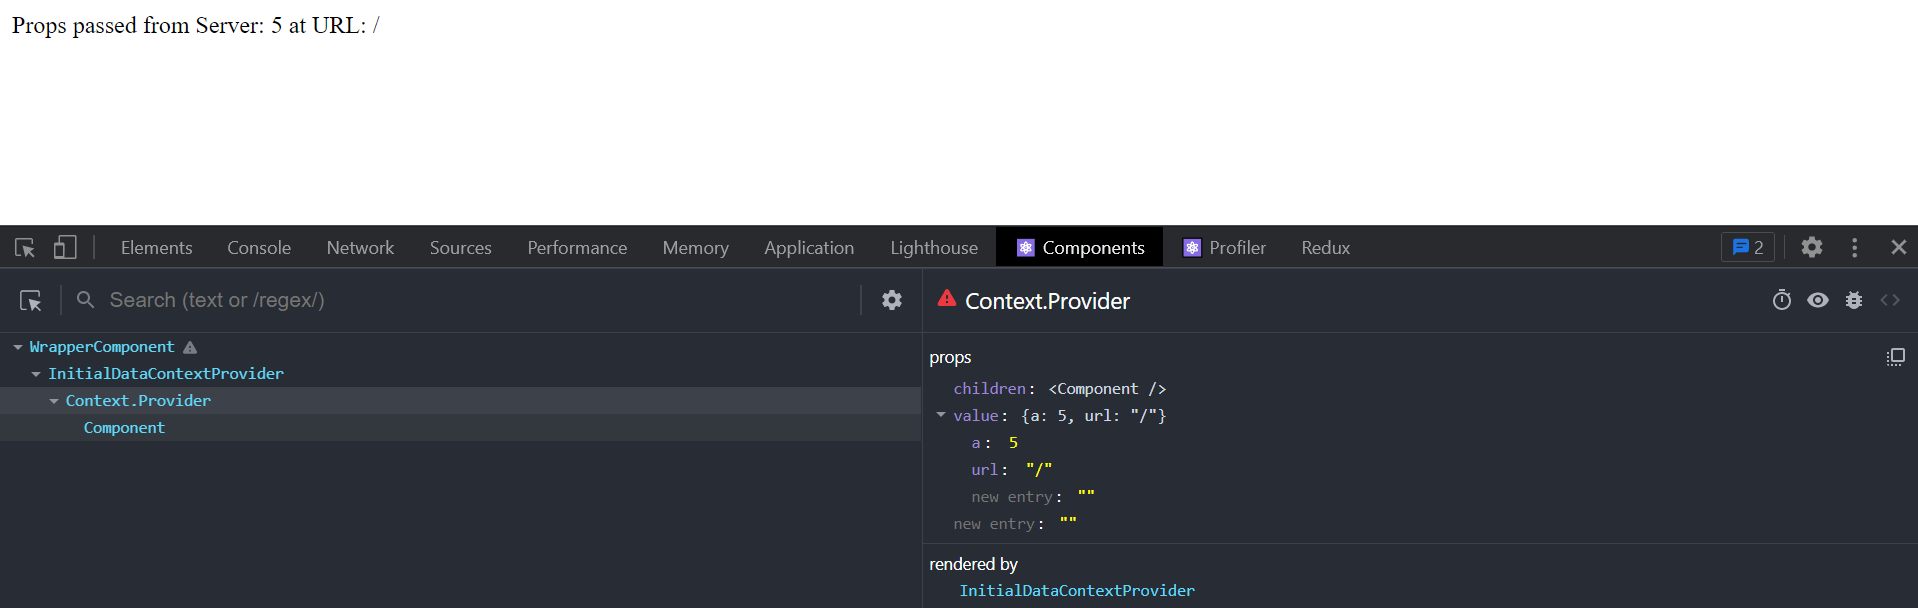
);Now to ensure this data fetched will be accessible inside every component on the page, we'll use React's Context API to propagate this data by creating an InitialDataContext.
// InitialDataContext.js
import { createContext, useRef } from "react";

export const InitialDataContext = createContext({});

const InitialDataContextProvider = ({ initialProps, children }) => {
	let initialData = useRef({ ...(initialProps || {}) });

	if (!initialProps && typeof window !== "undefined") {
		try {
			// On the client, read from the script tag created on the server side with initial props.
			const dataScriptTag = document.querySelector(
				'script[type="isomorph/data"]'
			);
			if (dataScriptTag)
				initialData.current = JSON.parse(dataScriptTag.innerHTML);
		} catch {
			console.error(
				"Invalid data passed from the server, please check your data loader hooks or file a bug."
			);
		}
	}

	return (
		<InitialDataContext.Provider value={initialData.current}>
			{children}
		</InitialDataContext.Provider>
	);
};

export default InitialDataContextProvider;
To have this data available using a hook, we'll create a useInitialData hook (This is more of a pattern inspired by Remix than Next.js):
// hooks/useInitialData.js
import { useContext } from "react";
import { InitialDataContext } from "../InitialDataContextProvider";

const useInitialData = () => useContext(InitialDataContext);

export default useInitialData;
Now you might wonder, what's up with the script tag check block for Initial Data Context on the client-side, well that's because we'll be creating a script tag with a specific ID, stringifying our props and reading it on the client-side before rendering the app so that the page renders with all the data available to it upfront.
// In server.js, we tweak the initial data for the client side.
const pageHTMLGenerated = `
...
<head>
	<script type="isomorph/data">${JSON.stringify(initialData)}</script>
</head>
...`;
And finally, for our WrapperComponent, we'll wrap our Context Provider around our page component.
// On server side: This component simply passes pageProps to the component
// On client-side: While rendering this component picks up the page props from the script tag and passes it to the component.
return (
+	<InitialDataContextProvider initialProps={pageProps}>
		<Component />
+	</InitialDataContextProvider>
);
Rendering the page on the Client-Side
We are done with rendering the page on the server side, now comes the toughest part, rendering the page on the client-side. It is one of those things every documentation tells you is possible using ReactDOM's render and hydrate functions, but no one tells you how.
Took a little digging, and the simplest approach is here:
- Create a template string that imports the page component and the wrapper component.
- Compile the code string using Babel to convert it to ES5
- Bundle the compiled code using Browserify to put all the required dependencies in a bundle (We'll tree-shake dead code in the next section).
- Embed the output to a script tag in the HTML sent to the client. So that the client-side rendering code is executed and the page becomes interactive on the client.
Let's see our client-side rendering template generator:
// src/utils/clientSideHydrationCodeGenerator.js
const getClientSideHydrationCode = (pageImportPath) => `
    import React from 'react';
    import ReactDOM from 'react-dom/client';

    window.React = React;

    import WrapperComponent from './node_modules/isomorph-web/package/WrapperComponent';
    import PageComponent from './.isomorph/${pageImportPath}';

    // Can use hydrate as well, but I want to keep the DOM on the client side fresh to remove any rendering inconsistencies that could creep in.
    const rootElement = document.getElementById("isomorph_root");
    const root = ReactDOM.createRoot(rootElement);
    root.render(<WrapperComponent Component={PageComponent} />);
`;

export default getClientSideHydrationCode;
In our server.js file, we'll use browserify and a plugin called babelify to first compile the template for the page component, and then bundle dependencies into a string that we can inject into the HTML for the page.
Before that, we need a package called string-to-stream as Browserify's API requires a Stream instead of a string.
npm i --save string-to-streamWe'll also add a utility function to convert Browserify's output to a string to inject into the HTML file.
// src/utils/streamToString.js
const streamToString = (stream) => {
	return new Promise((resolve) => {
		let string = "";
		stream.on("data", function (data) {
			string += data.toString();
		});

		stream.on("end", function () {
			resolve(string);
		});
	});
};

export default streamToString;
Putting it all together gives us:
// ...
import compileCodeToStream from "string-to-stream";
import babelConfig from "../babel.config.json";
import streamToString from "./utils/streamToString";

// ... Inside our request handler
const clientSideHydrationCode = getClientSideHydrationCode(pageImportPath);
const pageBundle = browserify()
	.transform("babelify", {
		presets: babelConfig.presets,
		comments: babelConfig.comments,
	})
	.add(compileCodeToStream(clientSideHydrationCode))
	.bundle();
const clientSideBundleString = await streamToString(pageBundle);
const pageHTMLGenerated = `
    <html>
        <head>
            <title>App Rendered By Isomorph</title>
            <script type="isomorph/data">${JSON.stringify(initialData)}</script>
        </head>
        <body>
            <div id="isomorph_root">${componentOutput}</div>
            <!-- Client Side Rehydration Chunk for the page -->
            <script type="text/javascript">
                ${clientSideBundleString}
            </script>
        </body>
    </html>
`;
Post sending this HTML back, we will get a page that will be fully interactive for the end-users and will re-render once to ensure all client-side data requirements are fulfilled.
You can differentiate whether you're on the server or the client using this expression inside your components:
typeof window === "undefined";Tree Shaking and Environment Variables support
For tree-shaking and environment variables, we can use tinyify plugin for Browserify to minify and tree-shake any unused dependencies. We'll also make sure it's only minified and tree-shaken on production.
let browserifyInstance = browserify()
	.transform("babelify", {
		presets: babelConfig.presets,
			comments: babelConfig.comments,
		})

+ if (isProd) {
+	// Tree shaking and minification + bundling of modules to production mode.
+	browserifyInstance = browserifyInstance.plugin(tinyify);
+}
For environment variables, we can use dotenv to read environment variables from a .env file.
npm i --save dotenv// At the top of our server.js file.
import { config } from "dotenv";
config();Now that we've read the environment variables we need from our .env file, we'll also want to compile our bundle with those environment variables and expose public environment variables starting with ISOMORPH_PUBLIC_ to the browser-side processes.
For the first, we have a nice plugin called envify for browserify that takes care of environment variables in code for us.
let browserifyInstance = browserify()
.transform("babelify", {
presets: babelConfig.presets,
comments: babelConfig.comments,
})
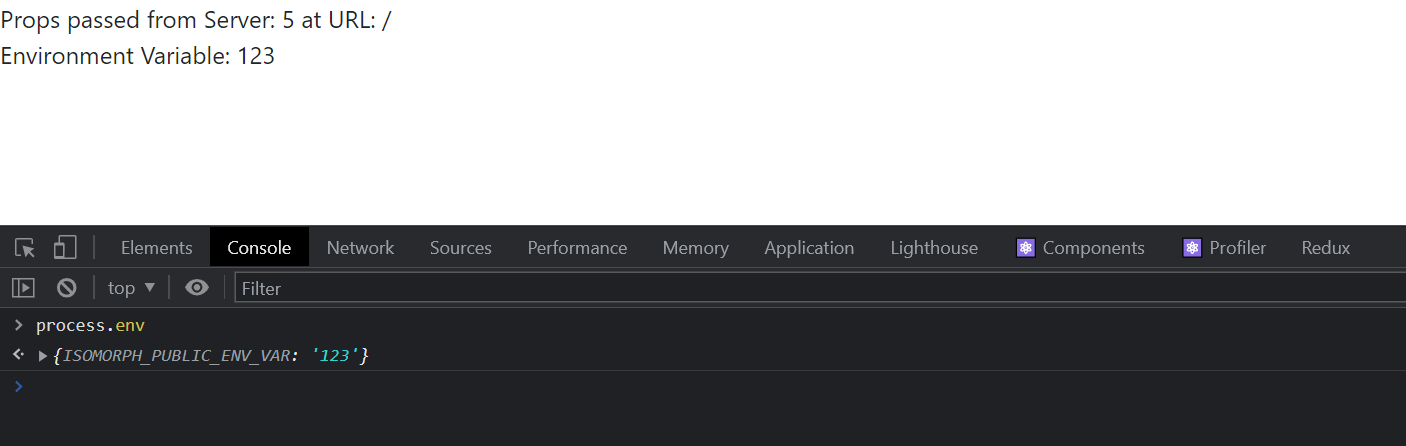
+ .transform(envify({ NODE_ENV: process.env.NODE_ENV }));To expose public environment variables, we'll add process.env as a global object using a script tag to our component code that sends the initial response from the server.
<!-- Public environment and browser variables to use later on the client-side if needed -->
<script type="text/javascript">
	window.process = {
		browser: true,
		env: ${JSON.stringify(processPublicEnvVars())}
	};
</script>
Where processPublicEnvVars is:
const processPublicEnvVars = () => {
	const envList = {};
	for (let key in process.env) {
		if (process.env.hasOwnProperty(key))
			if (key.startsWith("ISOMORPH_PUBLIC_")) envList[key] = process.env[key];
	}
	return envList;
};
Handling Page SEO, Link Tags and Scripts
Server-Side Rendering is incomplete without its biggest feature, which is the ability to improve metadata for the page and in turn improve the SEO and discoverability of pages.
We'll follow a pattern similar to Remix here, and provide a getPageMeta function alongside our data fetcher functions, to dynamically process and return an object that will contain stuff like meta tags, link tags and script tags.
const {
	default: ComponentDefault, // The React component for the page
	getPropsOnServer = nullFunction,
	getStaticProps = nullFunction,
+        getPageMeta = nullFunction
} = ComponentExports;
const context = generateServerSideContext(req, res, isStaticPage);
let [
    initialProps,
    staticProps,
    pageMeta
] = await Promise.all([
    getPropsOnServer(context),
    getStaticProps(context),
+    getPageMeta(context)
]);
The structure of what getPageMeta will return will be like the following:
{
	title: "Home Page",
	meta: [
		{
			name: "description",
			content: "A simple page generated on the server-side.",
		},
		{
			name: "viewport",
			content: "width=device-width, initial-scale=1.0",
		},
	],
	links: [
		{
			rel: "stylesheet",
			href: "https://cdn.jsdelivr.net/npm/bootstrap@4.3.1/dist/css/bootstrap.min.css",
		},
	],
	scripts: [
		{
			type: "application/ld+json",
			content: '{ type: "entity" }',
		},
	]
}
Using the above information, we can then populate our page's HTML with a head tag containing processed information
// In server.js, we tweak the code in the head tag for the page.
const pageHTMLGenerated = `
...
<head>
    ...
    ${generatePageMetaHTML(pageMeta || {})}
</head>
...`;
Where generatePageMetaHTML is a simple processor util function that takes the information returned from getPageMeta and gives us back HTML to inject into the page's code:
// utils/generatePageMetaHTML.js
const generateAttributesHTML = (entity) => {
	let attributeHTML = "";
	for (let attribute of Object.keys(entity)) {
		attributeHTML += `${attribute}="${entity[attribute]}"`;
	}
	return attributeHTML;
};

const generatePageMetaHTML = (pageMeta = {}) => {
	const metaTags = pageMeta?.meta || [];
	const linkTags = pageMeta?.links || [];
	const scriptTags = pageMeta?.scripts || [];

	let generatedHTML = "";

	for (let i = 0; i < metaTags.length; i++)
		generatedHTML += `<meta ${generateAttributesHTML(metaTags[i])} />`;

	for (let i = 0; i < linkTags.length; i++)
		generatedHTML += `<link ${generateAttributesHTML(linkTags[i])}></link>`;

	for (let i = 0; i < scriptTags.length; i++) {
		// No additional attributes
		const {
			content = "",
			id = "",
			className = "",
			type = "text/javascript",
		} = scriptTags[i];
		generatedHTML += `<script id="${id}" class="${className}" type="${type}">${content}</script>`;
	}

	return generatedHTML;
};

export default generatePageMetaHTML;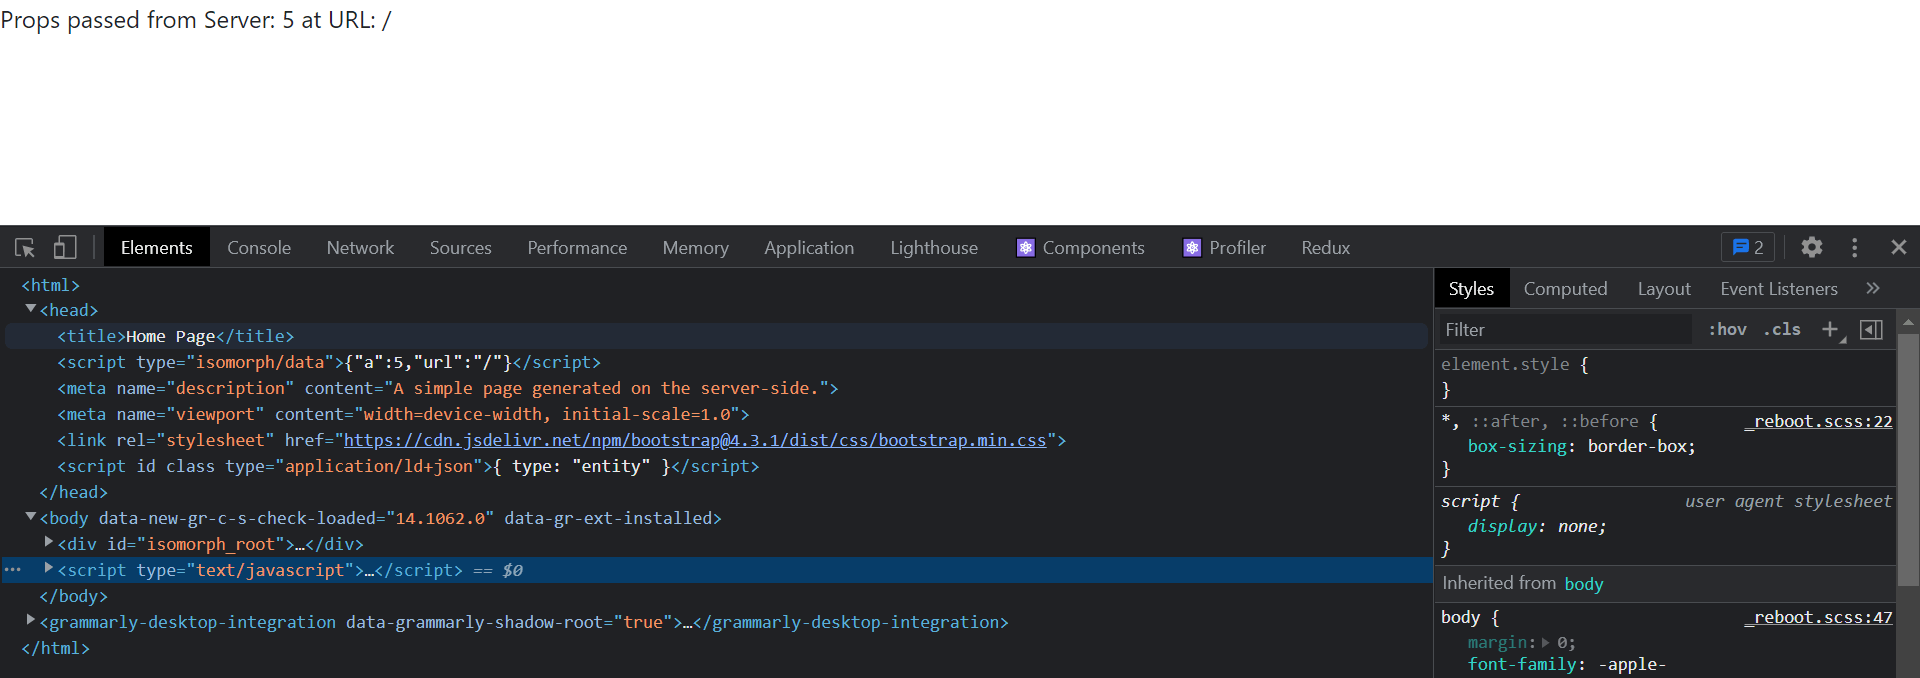
Handling Static Pages

If you've used Next.js (Which you probably have if you're reading this), you would know Next.js has great support for static pages. Static Pages are pages that are built once and cached for some time, they are not rendered over and over again to ensure that if a page is in the cache, it will always be fast to serve.
We'll identify a static page by the presence of getStaticProps or the absence of getPropsOnServer in the page file's exports.
const isStaticPage =
	!ComponentExports.getPropsOnServer || ComponentExports.getStaticProps;
When a new request comes in for a static page for the first time, we'll build the page bundle and cache it in a simple .html file before sending it to the client-side using the outputFile function from the fs-extra package that takes care of creating directories if they don't exist automatically.
if (isStaticPage) {
	// Write new HTML generated for this page to cache.
	outputFile(
		`./.isomorph/staticpages/${pageImportPath}.html`,
		pageHTMLGenerated
	);
}
We'll also maintain a local in-memory cache for the server to determine which pages have been cached already and which ones haven't yet.
// src/utils/staticPageCache.js
const staticPagesRevalidationCache = {
	// [path] -> lastRevalidation
};

/**
 * Function to check whether a static page should revalidate or not. Also updates the cache entry for the specified path.
 * @param {String} path : URL/pathname of the static page
 * @param {Number} revalidationInterval : Revalidation Interval in seconds for the static page.
 * @returns {Boolean} Whether the page should revalidate or not.
 */
const shouldPageRevalidate = (path, revalidationInterval) => {
	let pageEntryInCache = staticPagesRevalidationCache[path];
	if (!pageEntryInCache) {
		staticPagesRevalidationCache[path] = new Date();
		return true; // Has to be revalidated and cached
	}
	const now = new Date().getTime();
	if (
		(now - new Date(pageEntryInCache[path]).getTime()) / 1000 >
		revalidationInterval
	) {
		// Time since last revalidation is more than the revalidation interval
		staticPagesRevalidationCache[path] = new Date(now);
		return true;
	}
	return false; // No revalidation needed yet.
};

export default shouldPageRevalidate;
The next time the request comes for a static page, we'll check the disk for the existence of the page's compiled HTML file, if it exists, we'll send that back, if it doesn't, we'll go ahead to process the request further. (We also have a check for production environments, you don't want to cache pages when you're actively developing features on local development environments.)
const ComponentExports = await import(pageRelativePath);
const isStaticPage =
	!ComponentExports.getPropsOnServer || ComponentExports.getStaticProps;
if (isStaticPage && isProd) {
	try {
		// Follow the Stale-While-Revalidate approach, serve the static HTML saved first.
		// Then later on, create the page and store the HTML back to the cache.
		const cachedHtmlContentForStaticPage = readFileSync(
			resolve(process.cwd(), `./.isomorph/staticpages/${pageImportPath}.html`),
			{ encoding: "utf-8" }
		);
		res.send(cachedHtmlContentForStaticPage);
	} catch {}
}
If the page was served or not served, we can go ahead in the background to process the rest of the request if the page's revalidation interval is up (Can be specified just like Next.js with the revalidate property passed back from getStaticProps.
const shouldRunRestOfTheCode =
	!isStaticPage || isDev
		? true
		: shouldStaticPageRevalidate(req.url, staticProps?.revalidate || Infinity);

if (!shouldRunRestOfTheCode) return;
Bundle Caching
Once the client-side bundle has been generated, we probably don't need to generate it over and over again in a production environment, doing so will only slow down each request unnecessarily.
Instead, we can store the bundle once to a JavaScript file on the disk on the first request for that page, and instead of injecting the entire JavaScript into the HTML file for execution, we can tweak the script tag to instead link to the bundle file in the page-chunks folder.
We'll use Express' static file serving to serve the files from the disk.
// Before the app.get('*', ...) block.

app.use("/chunks", express.static("./.isomorph/page-chunks"));
// Time to generate the client-side bundle required to rehydrate/re-render the app on the client-side.
let clientSideBundleString;
if (isProd) {
// On Prod, check if there already exists a prebuilt page bundle.
// In case it does, there's no need to generate a new bundle for the page on each request.
const alreadyBuiltPageBundle = pageClientSideBundleExists(pageImportPath);
if (alreadyBuiltPageBundle) clientSideBundleString = true;
}+ if (!clientSideBundleString) {
const clientSideHydrationCode = getClientSideHydrationCode(pageImportPath);
...
const pageBundle = browserifyInstance
.add(compileCodeToStream(clientSideHydrationCode))
.bundle();
clientSideBundleString = await streamToString(pageBundle);
+ writeClientSidePageBundle(pageImportPath, clientSideBundleString);
}Where writeClientSidePageBundle is a util function that writes our page's bundle in the background to the disk.
// src/utils/writeClientSidePageBundle.js
const fs = require("fs-extra");

const writePageBundle = (pageImportPath, bundle) => {
	try {
		fs.outputFileSync(`.isomorph/page-chunks/${pageImportPath}.js`, bundle);
	} catch (err) {
		console.log(err);
	}
};
export default writePageBundle;
Now since we store the bundle file in the page-chunks folder inside .isomorph accessible directly via a request through /chunks/{pageName}.js, we can link to it in the script tag where we sent the entire page bundle before. This makes the HTML page super-light and decreases the time it takes to first load the page, the JavaScript responsible for client-side rendering and interactivity injection can download in the background and take control as soon as it's ready.
<!-- Client Side Rehydration Chunk for the page -->
- <script type="text/javascript">${clientSideLoadBundle}</script>
+ <script type="text/javascript" src="/chunks/${pageImportPath}.js"></script>
Cookie Parsing
For server-side requests, user auth information is important, and most of the time those requests are made based on a cookie stored in the request context. If you noticed in the generateServerSideContext block, for server-rendered pages we give back a cookies property using req.cookies, well, for getting a key-value object for cookies in a request, we have to use the cookie-parser middleware for Express.
npm i --save cookie-parser// src/server.js
import cookieParser from "cookie-parser";
...
app.use(cookieParser()); // Populates req.cookie for us, to be used in server-side requests to a page.Custom Error Pages
So far we've covered all aspects of creating and serving pages, but being developers means you'll often run into a lot of unknown and unexpected errors, module imports fail, users hit an endpoint that doesn't exist, backend API contracts break, etc. In such cases we don't want to serve a broken version of our page or a blank screen to our users, hence this is where error handling comes in.
Let's set up some basic handling for 404 (Page not found errors) and 500 (Internal Server Errors) status codes.
We'll also have the flexibility of using a custom _error.jsx page to serve a custom view for 404 and 500 status code errors, we'll pass it the statusCode prop as well as error which will be the error message.
In the request handler:
const pageRoute = req.url;
const pageImportPath = `pages${
	pageRoute.endsWith("/") ? pageRoute + "index" : pageRoute
}`;
+ // Send 404 response if page file does not exist.
+ const pageRelativePath = resolve(
+ 	process.cwd(),
+ 	`./.isomorph/${pageImportPath}`
+ );
+ const pageFilePresent = await pageFileExists(pageRelativePath);
+ if (!pageFilePresent) {
+ 	const { default: sendBackErrorResponse } = await import(
+ 		"./utils/sendBackErrorResponse"
+ 	);
+ 	return sendBackErrorResponse(res, 404, "Page Not Found");
+ }
We'll wrap the remaining request handler in a try-catch handler, in whose catch block.
try{
    ... Remaining part of the request handling code
}
catch (err) {
        if (res.headersSent) return;
        const { default: sendBackErrorResponse } = await import(
		"./utils/sendBackErrorResponse"
	);
        return sendBackErrorResponse(res, 500, err.message);
}
Now there are two functions that we need to take a look at, sendBackErrorResponse, it's a function that does two things (I know, functions should ideally do only one thing, but let it be an exception for now):
- Checks if there is a custom
_errorpage present. - If yes, render it on the server with the status code and error message and return it as the response.
// src/utils/sendBackErrorResponse.js
import ReactDOMServer from "react-dom/server";

const sendBackErrorResponse = async (res, statusCode, error) => {
	const { default: getErrorComponent } = await import("./getErrorComponent");
	const DefaultErrorComponent = () => (
		<>
			<b>{statusCode}</b> | {error}
		</>
	);
	const ErrorComponent = (await getErrorComponent()) || DefaultErrorComponent;
	return res
		.status(statusCode)
		.send(
			ReactDOMServer.renderToString(
				<ErrorComponent error={error} statusCode={statusCode} />
			)
		);
};

export default sendBackErrorResponse;
// src/utils/getErrorComponent.js
const getErrorComponent = async () => {
try {
const { default: ErrorComponent } = await import("./src/pages/_error");
return ErrorComponent;
} catch {
return null; // No error component present or error-free error handler component.
}
};
export default getErrorComponent;This handles the case when we want to send custom error pages with statusCode and error. Now let's see how we determine 404 errors as well. The logic is pretty simple, we'll check if src/pages/${pagePath} is present or not. There's a slight catch, with JavaScript there are numerous import paths available with extensions like .js, .jsx, .ts and .tsx. So we'll have to check for the existence of either one.
We'll use the existsSync function to check so.
// src/utils/pageFileExists.js
import { existsSync } from "fs";

const pageFileExists = async (pageFilePath) => {
	const pageFilePossibleNames = [
		`${pageFilePath}.js`,
		`${pageFilePath}.ts`,
		`${pageFilePath}.jsx`,
		`${pageFilePath}.tsx`,
	];

	const checkForFileExistence = (filePath) =>
		new Promise((resolve) => resolve(existsSync(filePath)));

	return (await Promise.all(pageFilePossibleNames.map(checkForFileExistence))) // Parallelize exists operation for page file
		.some((exists) => exists);
};

export default pageFileExists;
We can use the return value of the above function to determine whether a page file exists or not.
TypeScript Support
With the evolution of JavaScript, we have TypeScript as a widely used way to write code and React components, and since this is a framework that was built in 2022, not supporting TypeScript would be criminal. Supporting TypeScript in our codebase is pretty straightforward.
We'll just extend our Babel configuration to support TypeScript as well.
npm i --save @babel/preset-typescript{
"presets": ["@babel/preset-env", "@babel/preset-react", "minify", "@babel/preset-typescript"]
...
}On top of this, we'll have to add --extensions \".tsx,.js,.jsx,.ts,.json\" to our babel commands for TypeScript to work.
Putting it all together
After such a long post, I've compiled my library into a publicly available npm package that can be used to create Isomorphic React Apps, you can check the GitHub repository here and the npm package here that allows you to create isomorphic apps with a simple npx create-isomorph-app command.
There are n number of ways this library and the code I've mentioned above will break, and that's the point, this is a try at something much more complex that frameworks like Next.js and Remix solve, including a lot more than what this post covers.
Feel free to reach out to me in case you find any inconsistencies in the article. Just like all the amazing libraries and framework developers out there, even I am looking forward to constantly improving the quality of the code and content I deliver.