“Is my screen visible? Am I audible?” - Every person ever
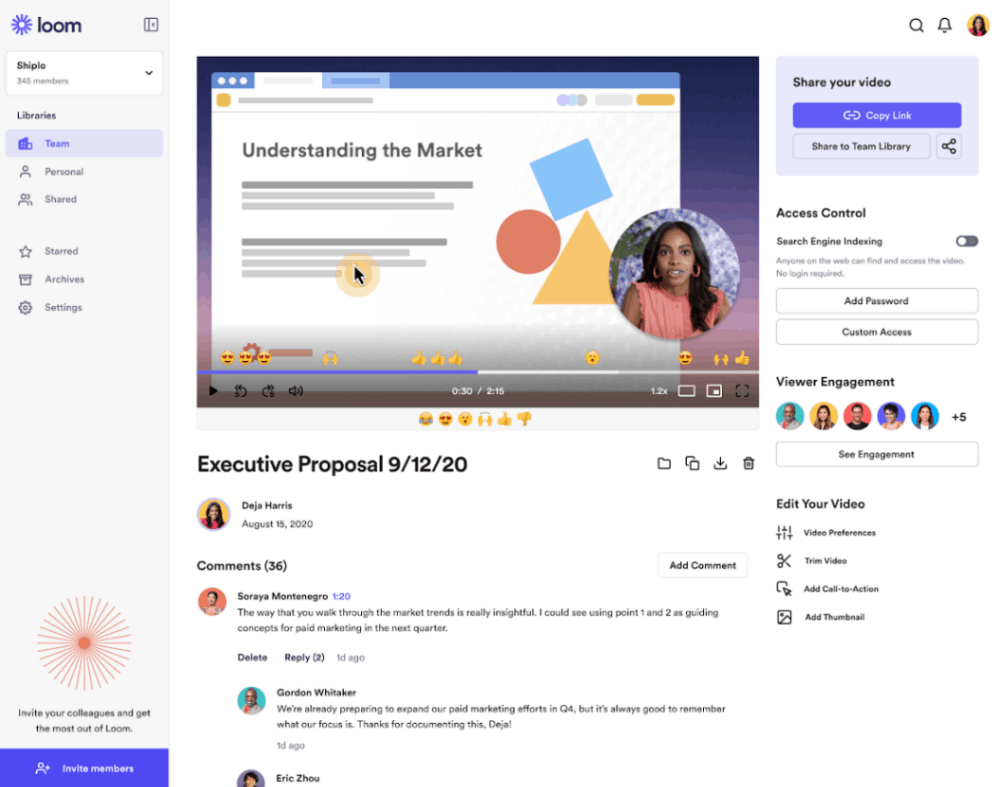
Audio and Video! They’re the most useful mechanism for data transfer, they’re so integral to the current world that we base our entire businesses around calls, we have video/voice calls over Whatsapp, video meetings over Google Meet/Zoom and we share information with our team using Loom.
Being such a ubiquitous method of information exchange, one would expect the implementation of such transfer methods would be fairly well-known or understood.
That couldn’t be farther from the truth!
Most users of video-and-audio enabling services, including Software Engineers like me go day-to-day using them for communication and workflows, without trying to dive into how they’re implemented.
I can’t blame anybody for it, it is simply because of the nature of media, it’s a great mechanism but very rarely understood simply because of its complexity. There are frame rates, canvases, streams, peer-to-peer connections, HLS, codecs and whatnot! There’s just a lot of noise around what you could learn and what you NEED to know to get started.
With such a large set of information to absorb to understand “how it all works”, anybody would give up on the first try (That’s pretty much what I did for the longest part).
There also isn’t any good pre-defined path to understanding all that’s needed to make it all work, businesses that run products around video and audio keep their algorithms and source code mostly proprietary as it’s a big competitive edge for everyone.
It’s great to know everything from low-level codecs to high-level media streams, but that’s not necessarily the best idea for everyone, a good understanding of the high levels of things often helps us go deeper gradually into implementation details.
So this post is a documentation of my learnings around operating with media with HTML, at a mid-to-high-level, not low-level (Wait for my post on that too 😉).
In this post, we’ll be looking at:
- The anatomy of any media in HTML and outside.
- Accessing the user’s video/audio/screen
- How to use a stream to display a video and subsequently record the stream?
And building on all our understanding from the above, we’ll take a look at:
- Recording your video and saving the output
- Recording your audio and screen and saving the output
- Recording your video with your screen and combining them using a Canvas
- Live streaming your video and audio using a P2P connection
We’ll also be taking a look at some really interesting things that one might have wondered about services like Zoom and Google Meet: How do they apply filters on top of your running video? and some other interesting bits.
That’s a lot of things to cover in a single article, bear with me as it’s one of the most interesting topics I’ve gotten my hands on in some time.
So let’s get started.
The basics: The anatomy of media
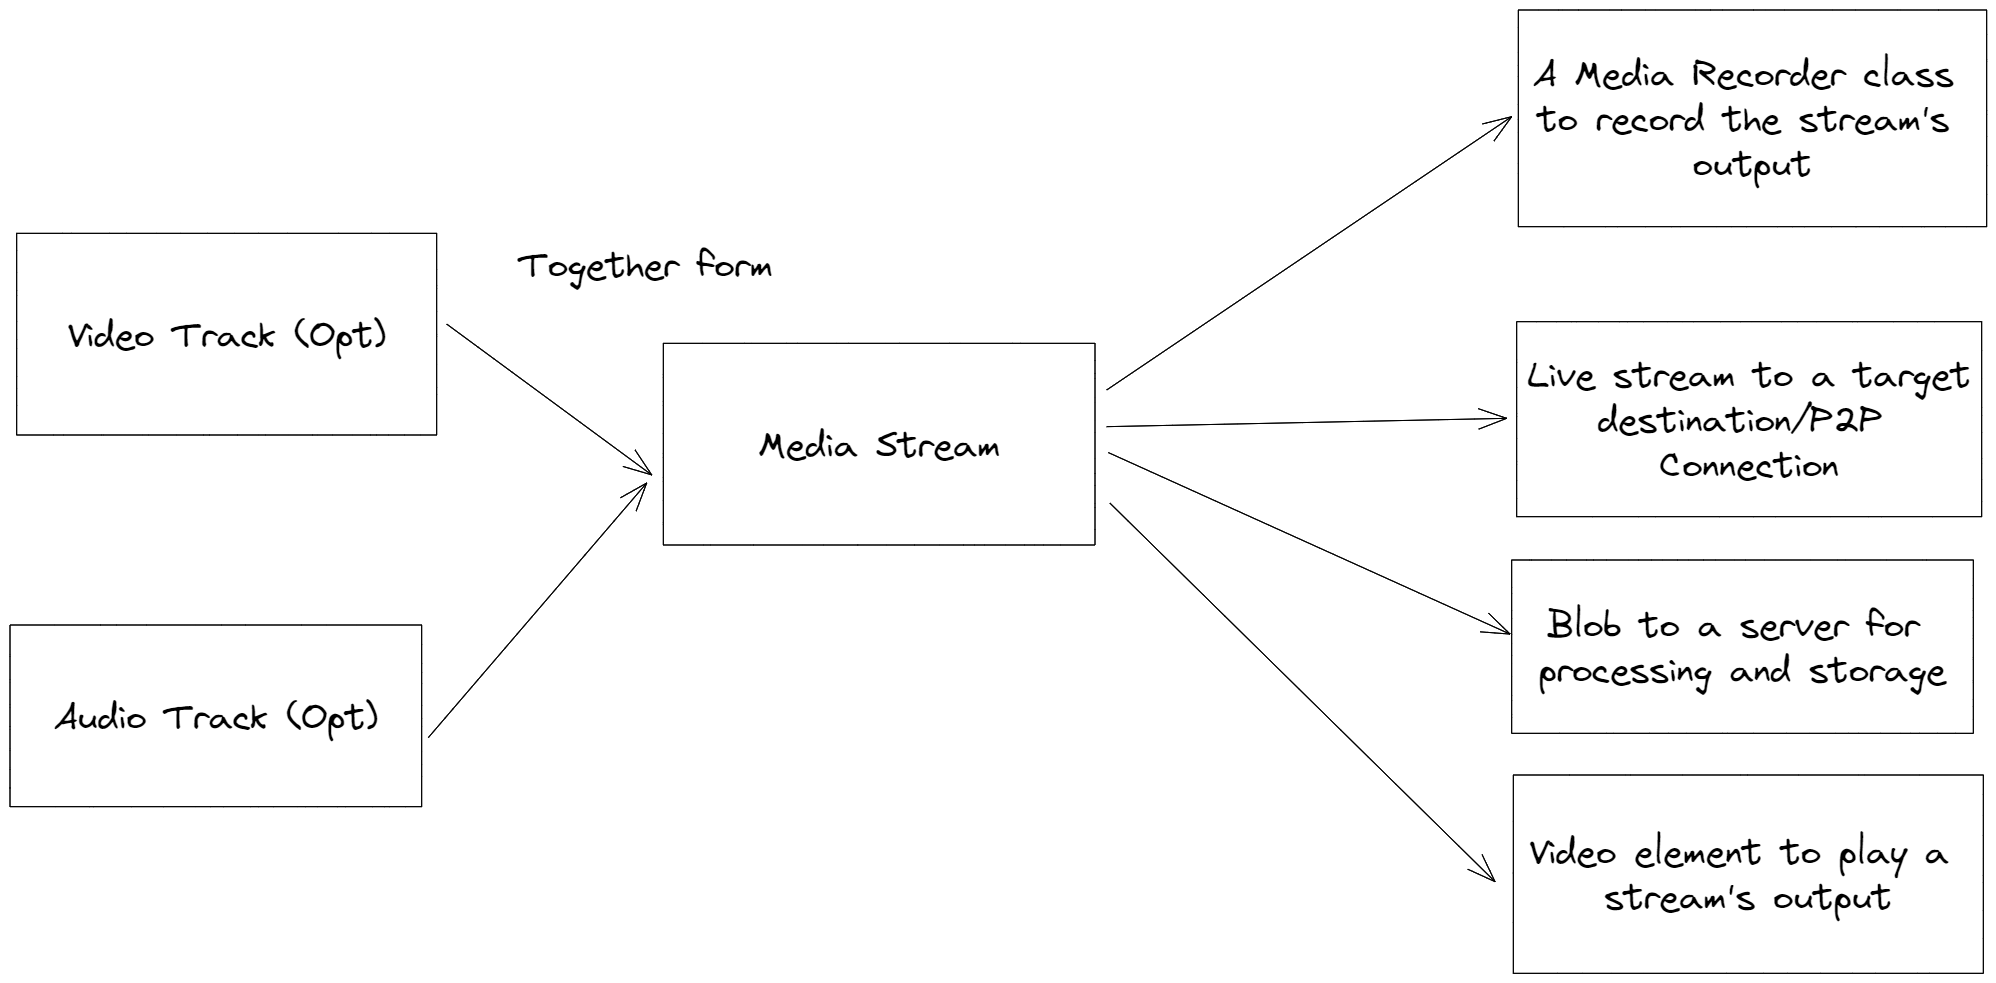
All media in HTML/JavaScript is composed of what are called Tracks.
If you are accessing the user’s screen, there are two tracks you’ll get: A video track and an audio track (Depending on whether you’ve asked for tab/screen audio while requesting screen sharing/user video and the user has allowed for the same to be shared)
This is the nature of any media file even outside of HTML, you have audio and video.
The tracks comprise a Stream of media that can be used as the source for video elements to play a continuous stream of video, or as Blobs in request payloads to servers for processing and storage for playback later or even to live stream (What services like Google meet and Zoom do) video and audio to other people.
There is a whole plethora of options that can be used to modify the audio and video being passed to the stream.
It’s all possible using a Media Stream!
Did you know? —————— You can display and play a video element without an
srcattribute or URL source set, and that is via assigning the video element’ssrcObjectto the media stream and invoking itsplayfunction.
const videoElement = document.querySelector('video');
videoElement.srcObject = mediaStreamFromScreenSharing;  // We'll see how it works in the next section
videoElement.play();
You can access tracks that comprise a media stream using the stream.getTracks() function, and it’s possible to create individual media streams from audio and video tracks.
const separateVideoStream = new MediaStream(fullStream.getVideoTracks());
const separateAudioStream = new MediaStream(fullStream.getAudioTracks());
We’ll see some more variations and usages of tracks as we go ahead in this post.
Accessing the user’s video/audio/screen
Building on our understanding of Media Streams in HTML, we can now start with the most basic thing we all do in all our meetings (Regardless of whether we turn on our videos or not), say “I hope my screen is visible.” or ask “Is my screen visible?”, let’s understand what we need to do to get the user to share their screen.
It’s fairly simple actually:
const screenSharingMediaStream = await navigator.mediaDevices.getDisplayMedia({ audio: true, video: true });The above is a simple code snippet that takes care of asking the user permission to share the screen and shows the users the required prompts to select the type of screen they want to share (An individual tab, the whole screen) and whether they want to share tab’s audio or not.
Depending on the choices of the user (An error will be thrown in case they decide to cancel the screen sharing option), you will get a MediaStream instance returned.
Now you can do pretty much anything we listed above with the stream. The simplest way to verify if it worked would be to simply assign the media stream to a video element and play it.
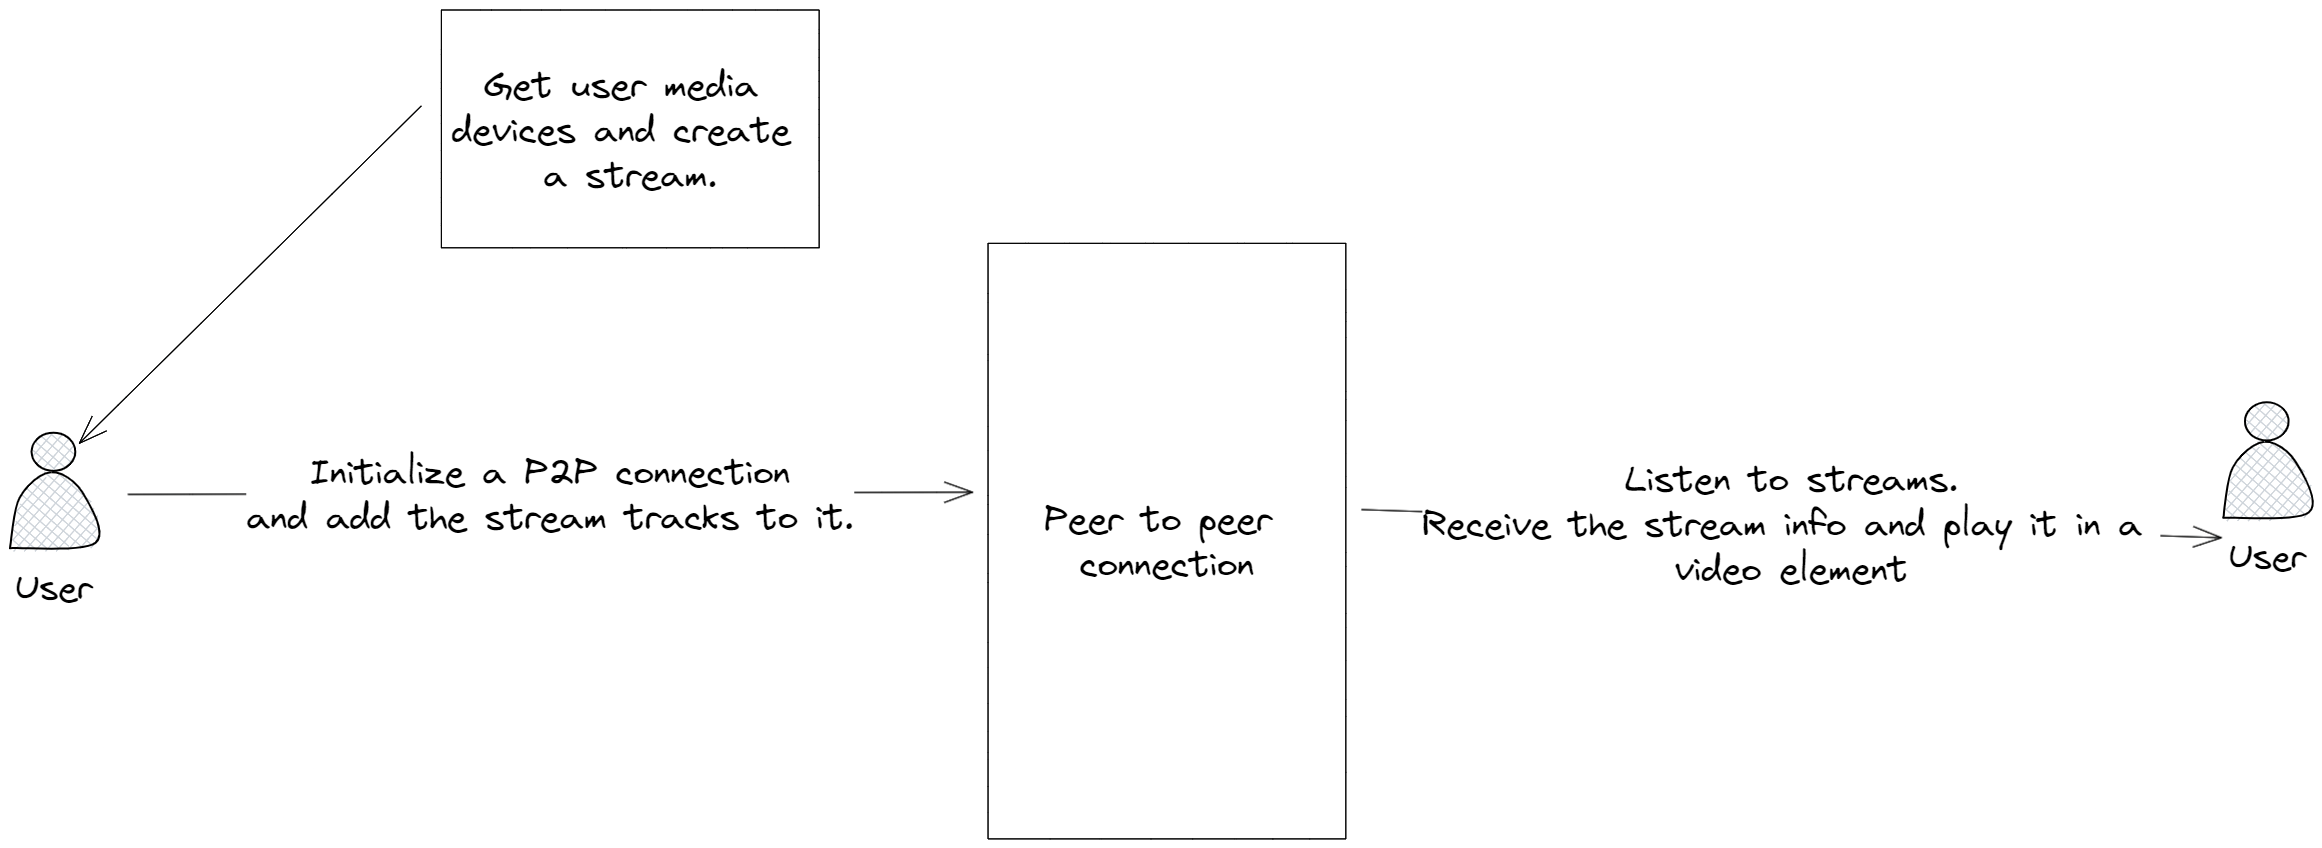
When you perform a screen share operation on a video call service, the stream is shared with the users connected in the call and it’s rendered in a video on their devices.
Something very similar happens when you want to share your video, the stream for your audio and video can also be received from a single line of code:
const userAudioAndVideoStream = await navigator.mediaDevices.getUserMedia({ audio: true, video: true });The media stream returned by the above snippet also behaves the same as the one returned by the screen-sharing operation.
Recording a stream and using its output
JavaScript gives us a very powerful API called the MediaRecorder API that utilizes a stream to record video. Using it is as simple as:
const recorder = new MediaRecorder(stream);The recorder can be started and stopped at any point, it has a dataavailable event which can be used to add chunks of media to an array to be used later for combination into a Blob.
const recordedMediaChunks = [];
recorder.start(
	// Optional: this argument tells the recorder to split the recording into 500-millisecond chunks
	500
);
recorder.ondataavailable = (event) => {
	recordedMediaChunks.push(event.data);
}
recorder.onstop = () => {
	// A recorder automatically stops when all the streams/tracks comprising are stopped.
	// Create a Blob from all the chunks.
	const combinedBlob = new Blob(recordedMediaChunks, , { type: "video/webm"	});
	// Now you can upload this blob to a storage system like S3/Firebase Cloud Storage and use it later for streaming.
	// or create a temporary local URL for the blob to download the recorded stream.
	const url = URL.createObjectURL(combinedBlob);
	console.log("Download from:", url);
	// Heck, you could even create an anchor tag with the download attribute using this url and click on it programmatically to auto-start the download.
}
Equipped with the knowledge of how to record a stream, we can now:
- Record the user’s screen using an output stream from
getDisplayMediapassing it to a media recorder and automatically downloading it when the user clicks on Stop Sharing. - Record the user’s audio and video using a stream from
getUserMediaand pass it to a media recorder.
Combining two videos using a Canvas
Both of the above are very simple to do in isolation, but if you’ve used services like Loom, you know the screen sharing and video of the user often appear in the same video.
How is that made possible? Well, it’s a genius concept made possible by the amazing HTML Canvas element and the APIs that are available to us around it.
Our objective in this section would be to get the user’s screen recording, as well as their video and audio, and combine the two video tracks from those streams in a way that the user’s screen takes the full space and the user’s video is visible on the bottom right of the screen sharing (We won’t be doing complex circles and border-radius operations as we can always revisit and do them later).
Let’s get started. Let’s first get the streams for both the screen recording and the user recording.
const userAVStream = await navigator.mediaDevices.getUserMedia({ audio: true, video: true });
const screenStream = await navigator.mediaDevices.getDisplayMedia({ audio: true, video: true });
Now that we have them, we’ll create three elements: two video elements and one canvas.
const combinedVideoCanvas = document.querySelector('canvas#combined-video');
const userVideo = document.querySelector('video#user-video');  // display: none, we don't want the user to see three videos
const streamVideo = document.querySelector('video#stream-video');  // display: none
We’ll assign the associated streams to the video elements.
userVideo.srcObject = new MediaStream(userAVStream.getVideoTracks());
screenVideo.srcObject = new MediaStream(screenStream.getVideoTracks());
userVideo.play();
screenVideo.play();
We’ll mount a recursive loop using requestAnimationFrame, it’s a neat alternative to recursive solutions like setTimeout and setInterval, it tells the browser to automatically perform an animation operation when it’s active.
We’ll use the canvas’s context and its drawImage API to draw images from both the video elements.
const drawVideoFrame = async () => {
	if (userVideo.paused || userVideo.ended || screenVideo.paused || screenVideo.ended) return;

	const ctx = combinedVideoCanvas.getContext("2d");

	const aspectRatio = screenVideo.videoHeight / screenVideo.videoWidth;
	const screenShareWidth = 1280;
	const screenShareHeight = Math.round(screenShareWidth * aspectRatio);

	const userVideoWidth = 300;
	const userVideoHeight = Math.round(userVideoWidth * aspectRatio);
	combinedVideoCanvas.width = screenShareWidth;
	combinedVideoCanvas.height = screenShareHeight;

	// First draw the screen recording.
	ctx.drawImage(
		screenVideo, 0, 0, combinedVideoCanvas.width, combinedVideoCanvas.height
	);
	// Now draw the user's video over it.
	ctx.drawImage(
		userVideo,
		combinedVideoCanvas.width - userVideoWidth,  // offset from left should be the difference between the canvas width and the width of the user video
		combinedVideoCanvas.height - userVideoHeight, // offset from the top
		userVideoWidth,
		userVideoHeight
	);
	requestAnimationFrame(drawVideoFrame);
};
requestAnimationFrame(drawVideoFrame);
Now, all we have to do to record it is to get a stream from the canvas, combine it with the audio streams from our screen sharing and video, and pass it to our recorder to handle the rest.
const canvasStream = combinedVideoCanvas.captureStream(30);  // 30 -> 30 times a second the canvas content is captured. I.E: 30 FPS
const combinedCanvasPlusAudiosStream = new MediaStream([
	// Audio from the user's microphone
	...userAVStream.getAudioTracks(),
	// Audio from the user's shares screen/tab
	...screenStream.getAudioTracks(),
	// The combined video
	...canvasStream.getVideoTracks()
]);

const recorder = new MediaRecorder(combinedCanvasPlusAudiosStream);
recorder.start(100);
...
This enables us to get a neat video with audio of us sharing our stream and our video, for us to download or publish to any service we want.
An interesting note/caveat: APIs like
setInterval,setTimeoutandrequestAnimationFramedo not work as expected when your tab is not in focus.
requestAnimationFrameis not triggered if your tab is out of focus as the main purpose of the function is to be used for compute-heavy animations, not screen recording.
To counter this you can remove
requestAnimationFrameand recursively call thedrawVideoFramefunction from itself but introduce several non-blocking async operations between each operation that add just the right amount of delay to avoid a maximum call stack exceeded error.
Perfect, now what about live streaming and making a service like Google Meet?
Whoa whoa whoa, stop right there, Google Meet, however simplistic its UI might be is to me, a marvel of frontend and backend engineering, simply because of how much it can leverage the browser without ever having to release a desktop client like Zoom has.
That being said, at a basic level, Google Meet is simply taking a media stream from your device and broadcasting it via a trip through their servers to your recipients.
We can do the same by sending continuous binary media stream output from one device to our server to another device and decoding that using a MediaSource to generate a MediaStream.
For simple live streams like a webinar, it might make more sense to use WebRTC specifications’s P2P networking.
Heck, it even makes sense for One-To-Many calls, One-on-One calls or even Many-to-Many calls for direct stream transfer from one device to another.
Libraries like Peer.js make it extremely simple for us to share video streams from one device to another (More on that in a separate post).
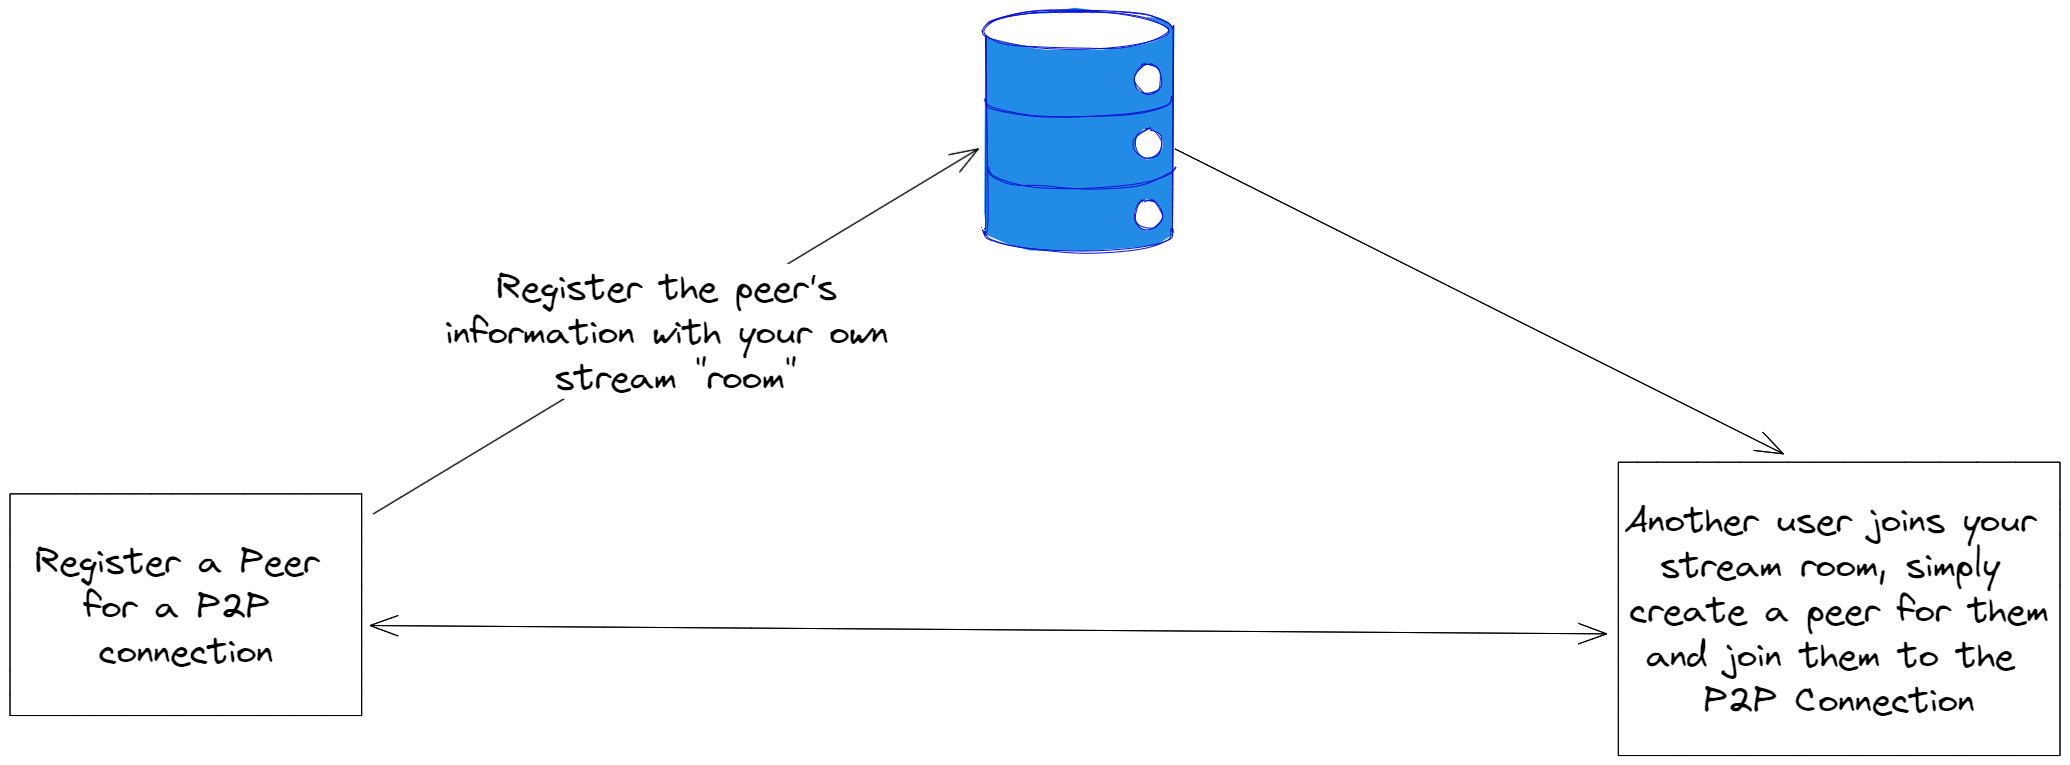
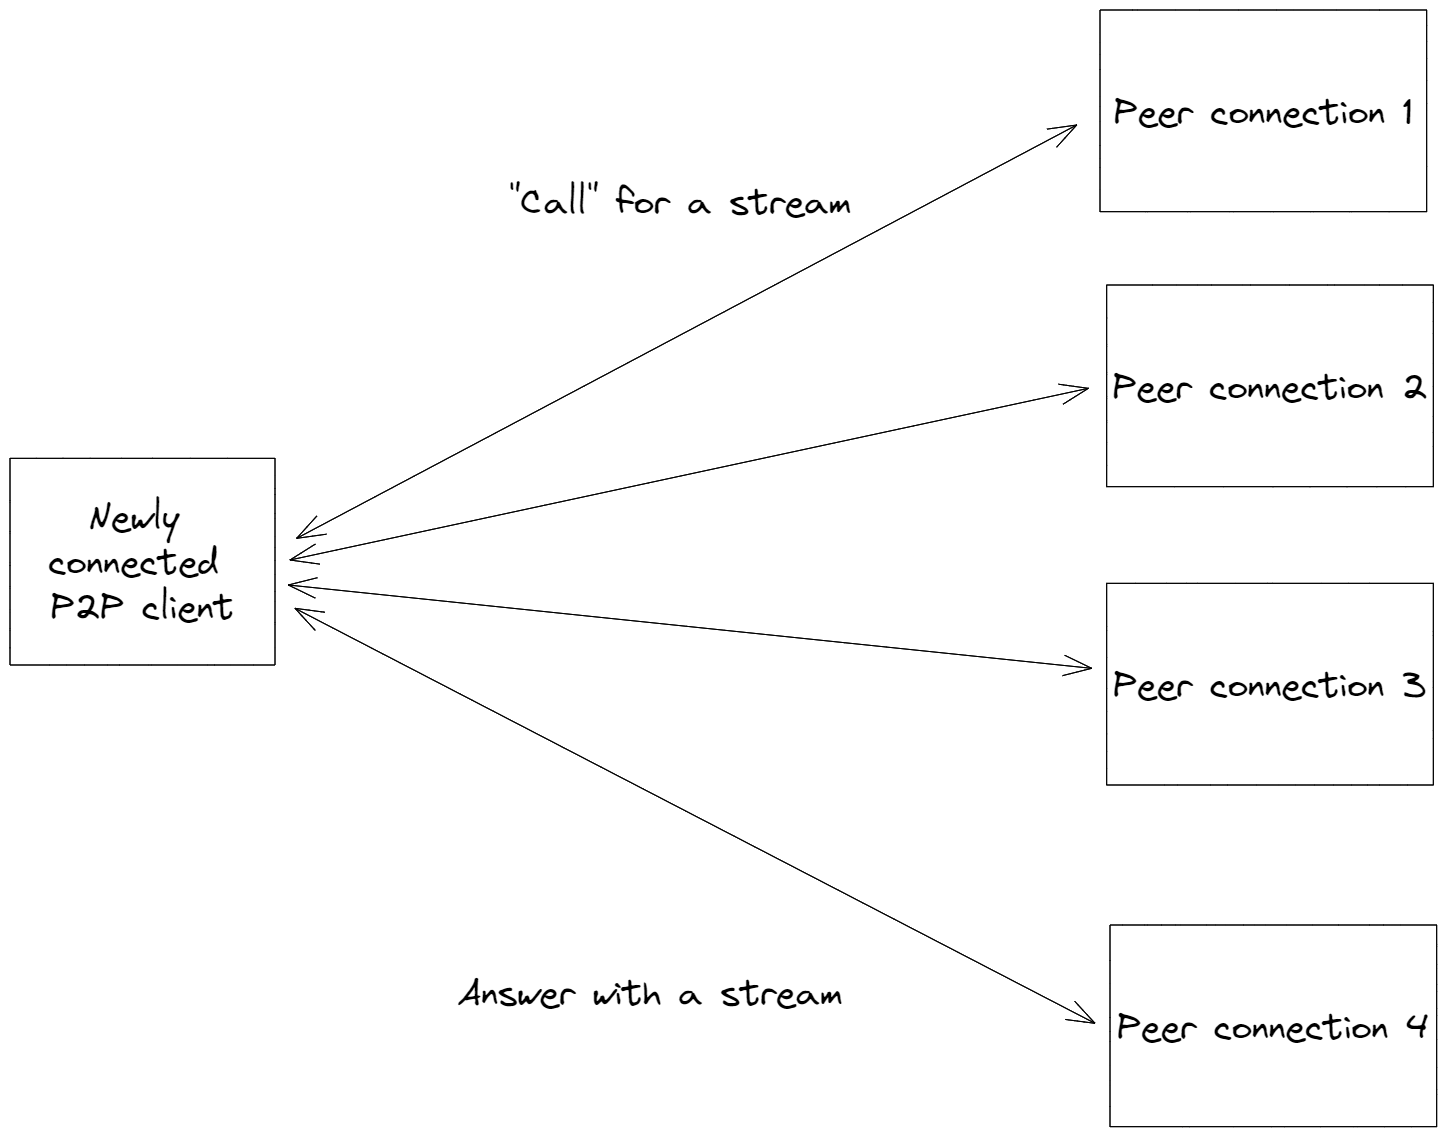
A simple registrar system where the server acts as the meta-data storage layer while the streams go through the peer-to-peer network:
Whenever there is a new entrant in the room, all the peer-to-peer connected clients simply send over their streams when asked for by the new peer-connected client.
// Peer 1
const call = sourcePeer.call('another-peer-id', { stream, id, ...info });
call.on('stream', ({ stream, id, ...info }) => {
	// Stream from another peer, show it somewhere
});

// Peer 2
targetPeer.on('call', (call) => {
	// Send its video stream and answer the call
	call.answer(stream);
  // Do something with the stream received from the source peer.
	call.on('stream', () => { ... });
});
I’ve greatly over-simplified how this works of course, it’s because of how beautiful the abstractions dealing with Peer-to-peer networking have become, you don’t have to think twice about data channels, TURN Servers to live stream your media (Although it makes sense to know about them, check out the references on WebRTC’s documentation for information on this).
Some interesting bits
How do video calling services apply filters to my video? 🦄
Ever enjoyed the video call filters that add a great background to an otherwise not-so-great background? Or just blur your background with just enough precision around the boundaries of your body to hide that one thing ruining your video call background?
Let’s discuss how that works.
There’s a very straightforward process to achieve this:
- The user selects the background they want to add to their video.
- The video calling service then creates a canvas element and a new video element.
- Your video is added to the new video element and at a sufficient frame per second rate painted onto the canvas just created.
- Using computer graphics algorithms and computation, the filter is applied to your video and a media stream derived from the canvas is rendered in both your main video.
- A stream that’s an addition of the canvas video track + your audio is sent over to the connected recipients and now both you and your audience see a video of you with the filter on.
It is almost magical. ✨
Since it’s a time taking process, it means all the processing of your video is pretty much happening on a canvas right on your device at n frames per second based on the video call service’s performance assessment, something a client-server implementation will simply not be able to keep up with at low-internet speeds, impressive right?! When did we get such power!
Why does my voice not echo back to me in Video Calls? 🔇
I always wondered this when I first started using Google Meet, how in the world is my audio not audible to me?! If you’ve never noticed this, go to https://new.meet right now and try speaking something, you won’t get an echo back from the tab of what you just spoke.
This is made possible by the fact that the video calling service sends your full media stream (Audio + Video) to the recipients (Hence if you join the same meeting from a different tab or an Incognito tab there is an echo due to the feedback loop), but for you, all it does is it splits the video track from your stream and only shows that to you, this also prevents the video element from creating an echo feedback loop and disturbing the whole user experience.
const mainVideoElementOnGoogleMeet = document.querySelector('#current-user-video');
mainVideoElementOnGoogleMeet.srcObject = new MediaStream(userAVStream.getVideoTracks());
mainVideoElementOnGoogleMeet.play();
How do Video chat services toggle access to your video camera and microphone? 🎤📹
When you click on the dreaded turn video on or turn the microphone on button (Which let’s face it, you already know is pretty much recording all the time, at least the microphone), your video camera lights up or your microphone sign suddenly gets activated.
On pressing the buttons again, your video camera’s flash turns off and the microphone symbol turns off from your tab.
This is made possible because of two things:
- If a track has to be turned off, it can be stopped individually using
track.stop()and the media stream as a whole can continue going on. - If a track has to be turned on (Like audio or video), there’s no way but to simply create a new media stream altogether with the required tracks enabled (Hence the slight delay or request for permission to access your video when you turn the video on).
I hope this post was interesting, this does not cover everything I would have wanted to. But the abstractions available to us with JavaScript for media access and streaming are beyond beautiful and very interesting to work with.
I have written this post from the perspective of video calls and streaming, but there’s absolutely no limitation on what could be done, I for example, use my implementation consisting of a media stream and recorder to record and store sensitive screen-sharing videos for my reference inside my system without having to rely on a third party 🔒.
You could similarly solve your problems with whatever we’ve discussed in this post.
At the end of the day, with Media demystified, not even the sky’s the limit on what can be built. 🎉

